Author: sdhakad-yogapeace

How to Practice Vajrasana with Knee Pain – Easy Method, Benefits & Precautions

Dear friends,
Warm and smiling greetings to you all.

Welcome to our article series “One Step from Health to Bliss.”

Today’s topic is — How to practice Vajrasana when you have knee pain.
In the previous part, we understood that Vajrasana strengthens the digestive system.
Today, we will understand how Vajrasana supports digestion and how people with knee pain can safely practice it using props (supportive aids).

How Vajrasana Strengthens the Digestive System

It is traditionally believed that a subtle energy channel called the Vajra Nadi is located near the buttocks.
When we sit in Vajrasana, gentle pressure from the heels activates this Vajra Nadi.

This nadi is associated with the large intestine.
When Vajra Nadi becomes active, it stimulates and strengthens the digestive system.

Additionally, while practicing Vajrasana, blood flow to the legs and thighs slightly reduces,
which increases blood circulation in the abdominal region.
This enhanced circulation supports digestion, making Vajrasana one of the most beneficial postures for digestive health.

How to Practice Vajrasana with Knee Pain (Using Props)

If you experience knee pain, there is no need to avoid Vajrasana completely.
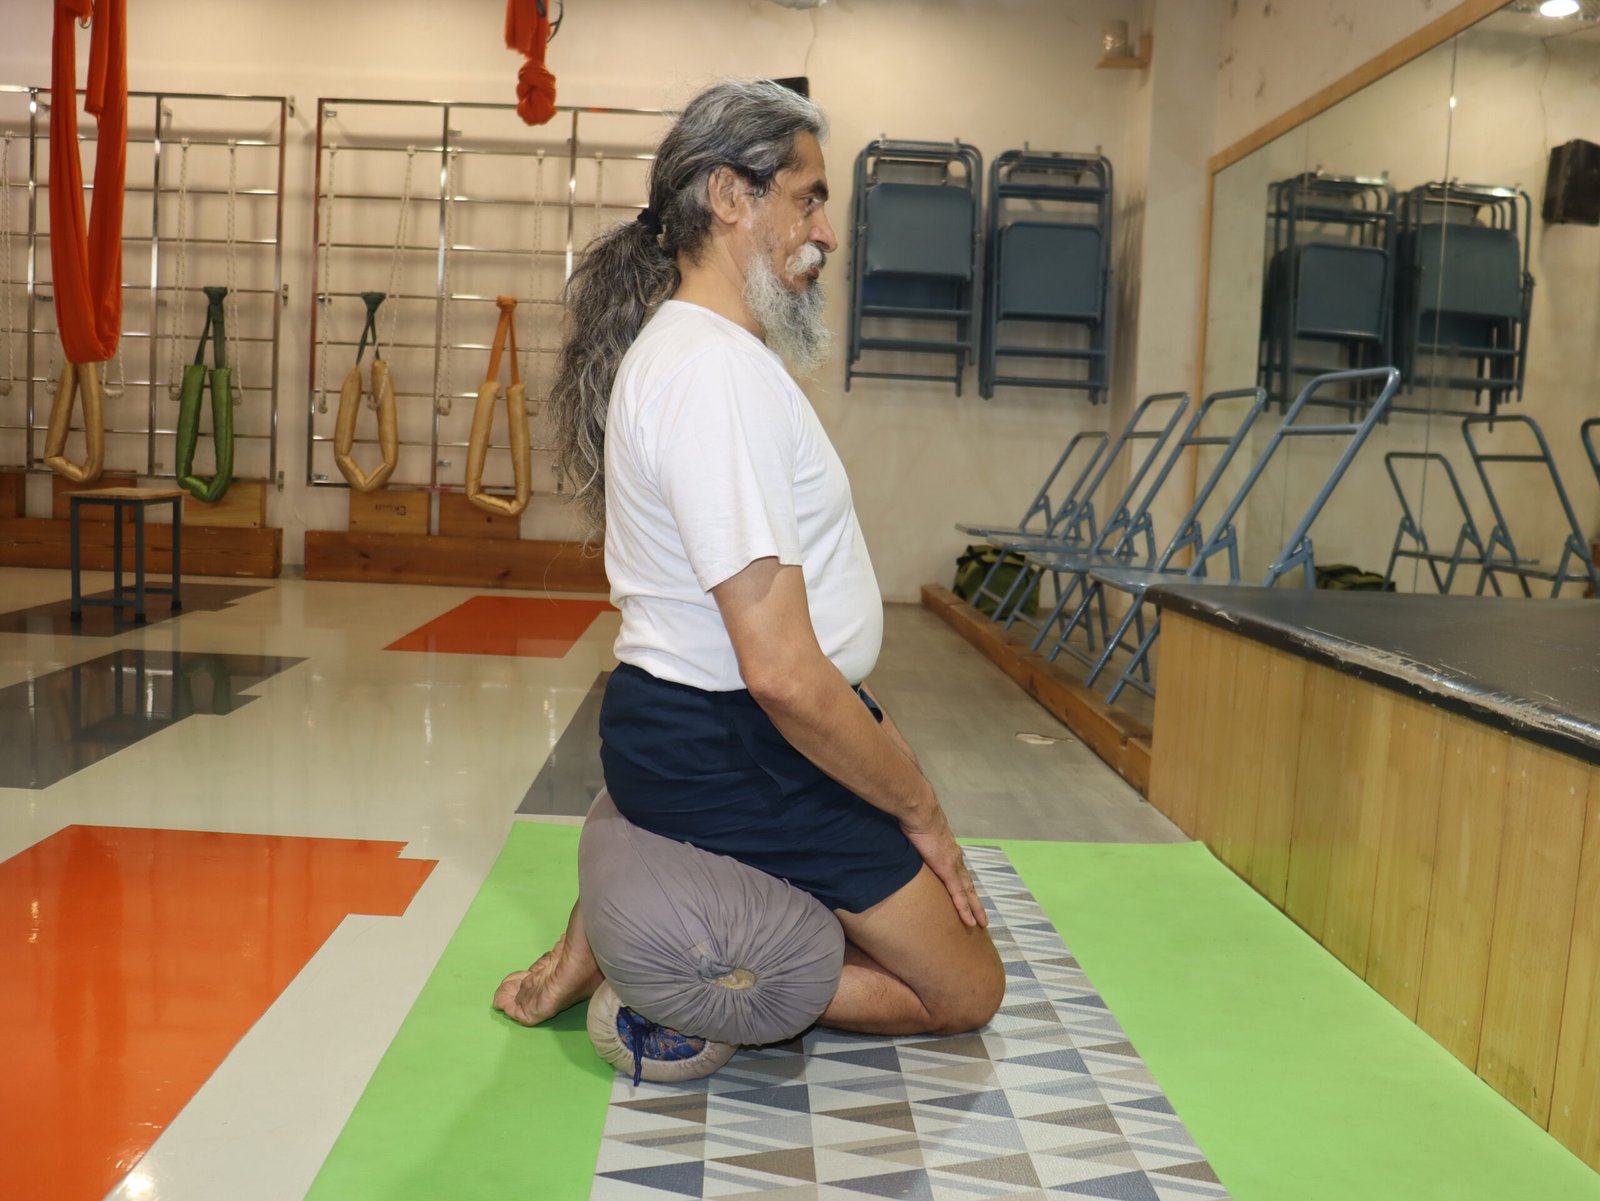
With the help of props such as cushions, bolsters, or folded blankets, Vajrasana can be practiced comfortably and safely.

Method 1: Using a Small Bolster

  1. Take a small round bolster.
  2. Sit in the Vajrasana position.
  3. Place the bolster under both ankles.
  4. Keep your spine straight and bring both heels close together.
  5. Close your eyes and sit calmly for a few moments, focusing on your breath.

Method 2: Using a Bolster and Cushion

  1. First, sit in Dandasana.
  2. Slowly come into the Vajrasana position.
  3. Place a small bolster under your ankles.
  4. Place a cushion between your calves and thighs.
  5. Notice how the pressure on the knees reduces and sitting becomes more comfortable.

👉 If a bolster is not available, you may use a pillow, folded blanket, or folded bedsheet as an alternative.

Benefits of Vajrasana

• Strengthens the digestive system
• Relieves indigestion, gas, acidity, and bloating
• Helps food digest properly when practiced after meals

Precautions

• People with knee pain should practice Vajrasana only with the support of props
• Always keep the spine straight while sitting
• Practice Vajrasana immediately after meals, but avoid sitting for too long

Sitting in Vajrasana for a few minutes after meals
is a simple, natural, and effective solution for problems like acidity, gas, and bloating.

So dear friends,
My heartfelt salutations to you all.
Stay happy, stay relaxed, and remain blissful.

Yogacharya Dhakaram
Founder – Yogapeace Sansthan
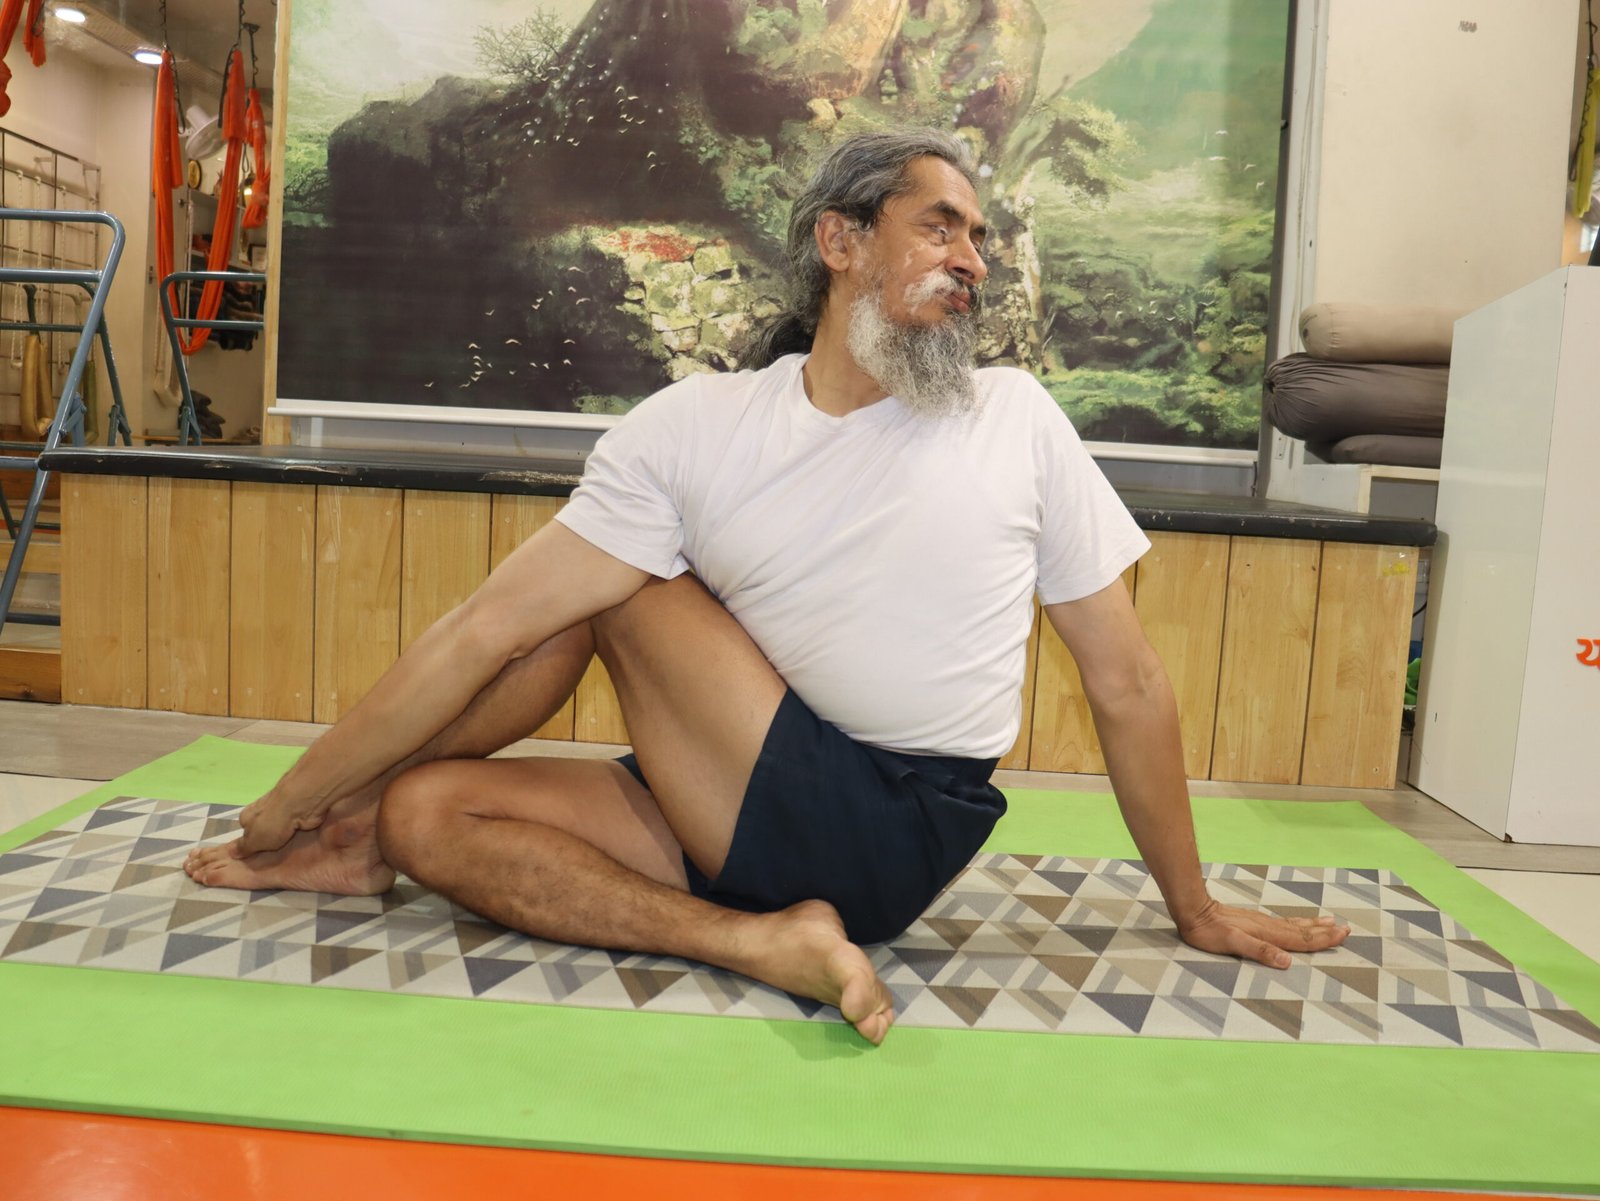
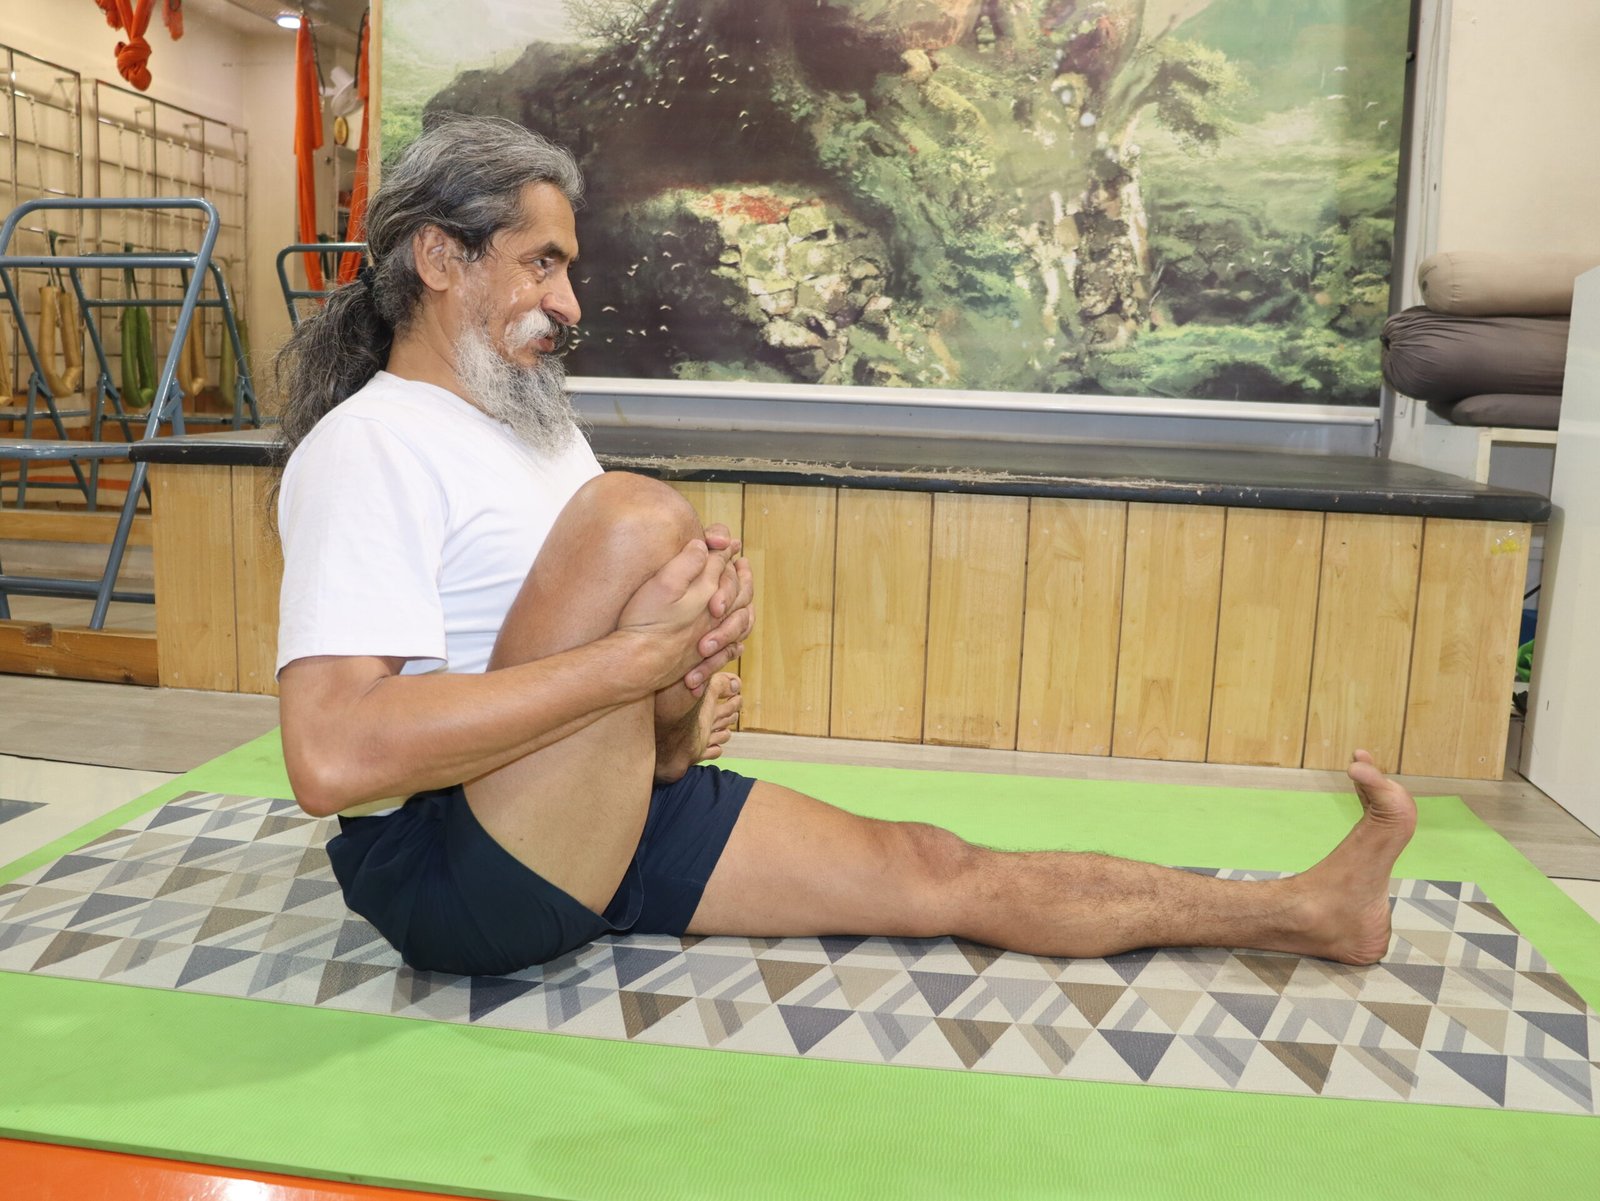
Ardha Matsyendrasana: A Powerful Seated Twist for Spinal Health

Warm greetings to all of you. Welcome to the “One Step from Health to Bliss” program. Today, we will talk about Ardha Matsyendrasana—its method, precautions, and benefits. In our previous session, we discussed Vakrasana. Ardha Matsyendrasana is a slightly advanced posture compared to Vakrasana. This asana is dedicated to Matsyendra Nath Rishi.

How to Practice Ardha Matsyendrasana (Step-by-Step)

  1. Sit comfortably in Dandasana.
  2. Bend the left leg and place the left heel near the right hip.
  3. Bend the right leg and place the right heel near the left knee.
  4. Twist the torso gently backward.
  5. Raise the left arm and, taking it over the right thigh, try to hold the toes of the right foot.
  6. Place the right hand on the floor behind the waist for support.
  7. Keep both shoulders in one straight line and deepen the twist as much as comfortable.
  8. Remain in this position for at least 1 minute.
  9. Slowly return the same way you entered the posture.
  10. Close your eyes and observe the difference before and after the asana.
  11. Rest for 20 seconds, then repeat the same posture on the other side.

Practicing on the other side:
Sit again in Dandasana. Bend the right leg and place the right heel near the left hip. Bend the left leg and place the left heel near the right knee. Twist the torso backward, raise the right arm over the left thigh, and hold the toes of the left foot. Keep the left hand behind the waist. Exhale and gradually deepen the twist. Stay for 1 minute, then return slowly and observe the changes.

Precautions

  • Both shoulders should remain aligned in one straight line.
  • Keep the spine erect while twisting.
  • Distribute body weight evenly on both sitting bones.
  • If you cannot hold the toes, gently press the knee with the elbow and the elbow with the knee.
  • The bent knee placed upright should be at a 90-degree angle.
  • People suffering from hernia or ulcers should avoid this asana.
  • Women during menstruation and pregnancy should not practice this posture.

Benefits

  • Highly beneficial for people with diabetes.
  • Massages all the internal abdominal organs.
  • Improves flexibility of the spine.

Use of Support (Props)

Those who find it difficult to sit on the floor may use a wooden platform or block. This elevates the hips slightly, creates space between the abdomen and thighs, and allows a deeper and more comfortable twist.

Closing Note

With this, we extend our heartfelt thanks to all of you. Stay joyful, stay blissful.
— Yogacharya Dhakaram
Founder, YogaPeace Sansthan

How to Make Your Hips Flexible

Hari Om, dear friends. Warm greetings to all of you.
Welcome to the program “One Step from Health to Bliss.” We hope you are healthy, cheerful, and living joyfully.

Today, we will discuss Padmasana (Lotus Pose). Almost every yoga practitioner wishes to sit comfortably in Padmasana. However, to practice Padmasana correctly, it is essential to first prepare and open the joints—especially the hip joints and ankle joints. Only when these joints become flexible can Padmasana be practiced with ease and stability.

Brief Introduction to Padmasana

To come into Padmasana, first sit in Dandasana.
Bend the right knee and place the right foot on the left thigh.
Then bend the left knee and place the left foot on the right thigh.
This position is known as Padmasana.

First Practice: Making the Hip Joints Flexible

  1. Sit comfortably in Dandasana.
  2. Bend the right knee and place the right foot on the left thigh.
  3. Support the right knee just below it with your right hand.
  4. Hold the ankle and heel of the right foot with your left hand.
  5. Gently move the right knee backward toward the right side.
  6. Then move the right knee backward toward the left side.
  7. Move only as much as your body comfortably allows.
  8. Perform this movement three times to the right and three times to the left.

Now repeat the same process with the left leg:
Place the left foot on the right thigh, hold the left knee with the left hand, and the ankle and heel with the right hand.
Move the knee backward to the left side and then to the right side.
Repeat the movement the same number of times as you did with the right leg.

Second Practice: For Hip and Knee Mobility

  1. Place the right heel close to the navel.
  2. Hold the right knee with both hands and gently draw it toward the chest.
  3. Hold this position for 10–15 seconds.
  4. Then guide the knee downward toward the floor and hold again for 10–15 seconds.
  5. Repeat this movement three times upward and three times downward.

Now repeat the same practice with the left knee, maintaining the same number of repetitions as done on the right side.

Important Practice Tips

Many people perform these movements too quickly. While fast movements may feel beneficial initially, the true yogic benefit is achieved only when these practices are done slowly, mindfully, and with awareness.

With regular and mindful practice:

  • The knees become more flexible
  • The hip joints gain smoothness and mobility
  • Padmasana becomes easier, steadier, and more comfortable

Benefits

  • Padmasana helps maintain an upright and aligned posture.
  • The chest opens, supporting better breathing and lung expansion.

Precaution

  • Always perform yogic practices slowly, attentively, and within your physical limits.

Closing Note

With this, we extend our heartfelt thanks and gratitude to all of you.
May you remain happy, energetic, and blissful.

— Yogacharya Dhakaram
Founder, YogaPeace Sansthan

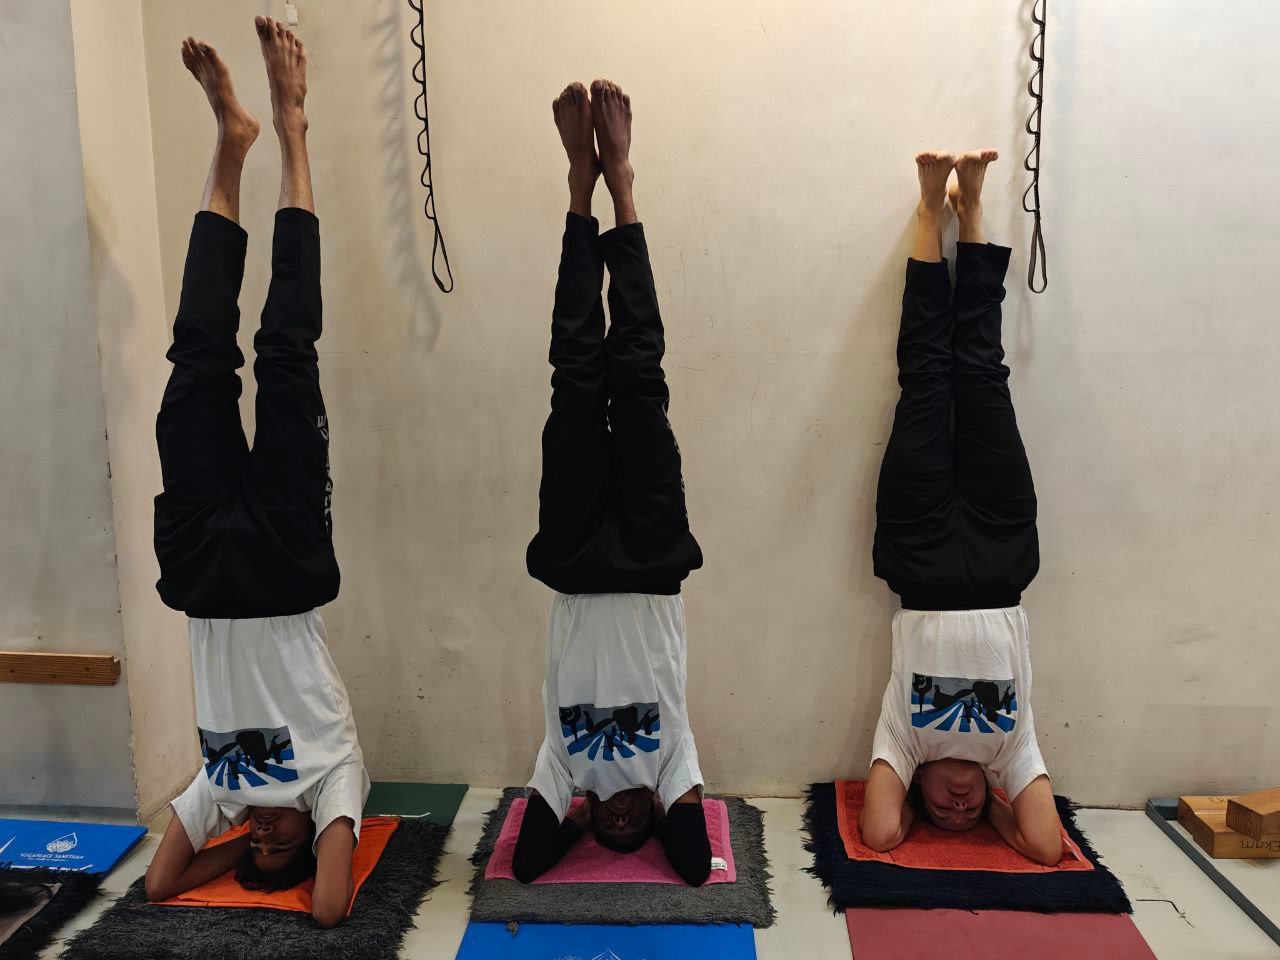
Part 3 — Headstand (Shirsan with Triangle Support)

Dear friends,
Warm greetings and a smiling Namaste to all of you!
Welcome once again to our program “A Step from Health to Bliss.”

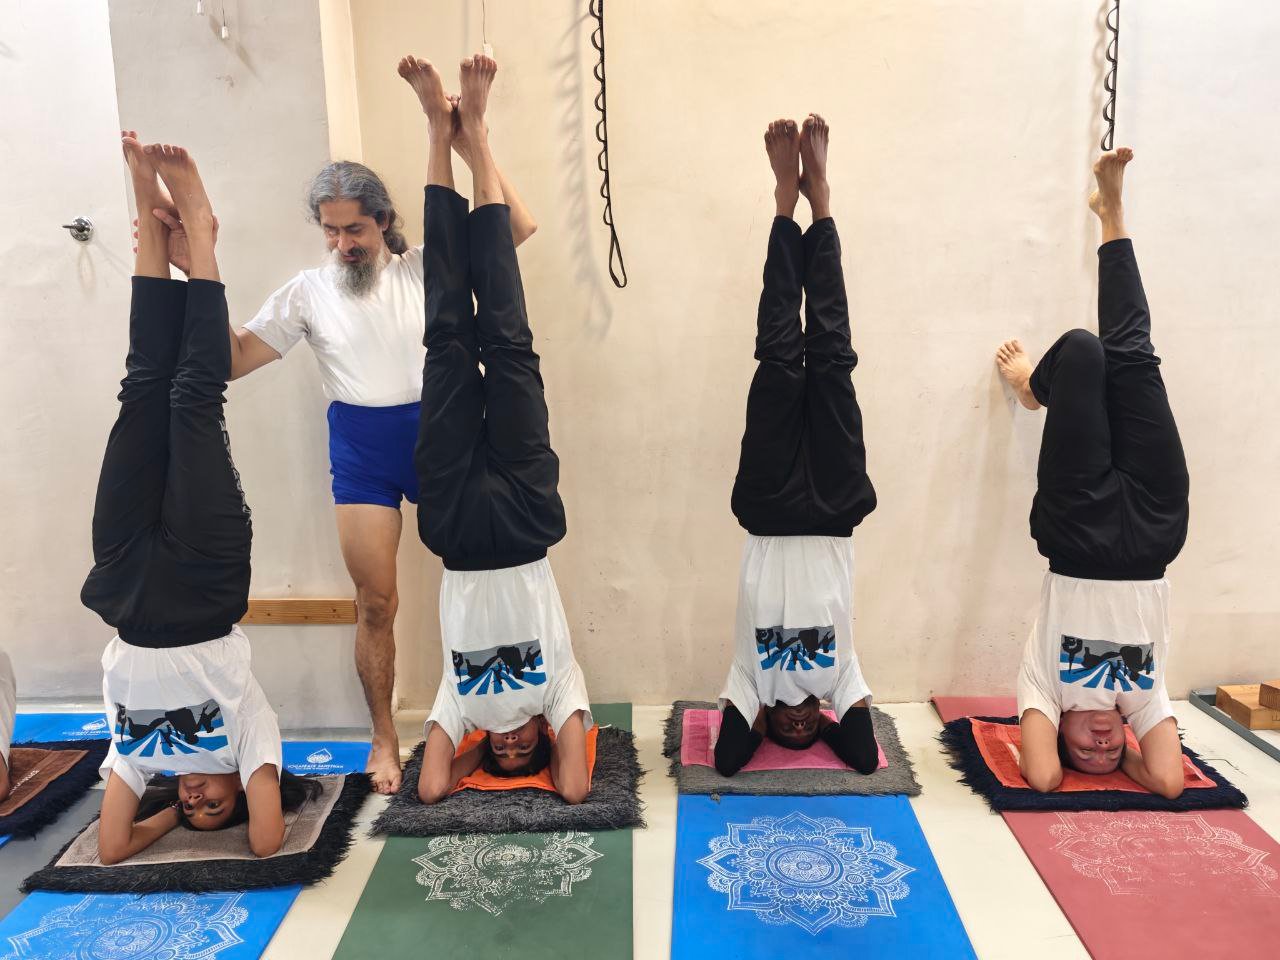
In the previous session, we discussed how to perform Headstand (Śīrṣāsana) more effectively. Those who find it difficult to balance in the headstand can take support of a wall.
If you are still unable to balance even with wall support, you can try doing Headstand with a Triangle Support (Trikon method).
As promised earlier, today we will learn how to perform Headstand in the triangle setup.


Important Guidance

Always practice Śīrṣāsana under the supervision of a qualified teacher or experienced practitioner.
Practicing the wrong alignment over a long period can disturb your body posture and spinal balance.


Why Practice Headstand in Triangle?

When doing a headstand against the wall, we often cannot tell if our body is straight or tilted.
Our legs may lean left or right, causing the posture to become imbalanced.
By using the triangle setup, your legs and body remain straight, ensuring proper alignment and balance.


Preparation for Headstand

  1. Mat or Blanket Setup
    • Length: around 2 feet
    • Width: around 2 feet
    • Height: 2–3 inches
      Fold the mat or blanket in a triangle shape and place it on the floor.
  2. Hand Position
    • Interlock your fingers.
    • Keep your elbows shoulder-width apart.
    • Form a triangle using your elbows and interlocked fingers.
  3. Head Position
    • Place the topmost part of the head on the floor.
    • Rest the palms gently on the raised part of the head for stability.
  4. Body Position
    • Raise your hips upward.
    • Gently bring your waist close to the triangle wall setup.
    • Slowly lift your legs upward so your body and legs align at the center of the triangle.

Duration of Practice

  • Beginners: 1–2 minutes
  • With regular practice: Up to 5 minutes
  • Breathing: Keep your breath normal.
  • Focus: Tighten the hips slightly and maintain steady balance.

Returning from the Posture

  1. Slowly bend your knees and lower your legs down.
  2. Come into Child’s Pose (Shashankasana).
  3. Rest your head on your hands and relax.
  4. After a while, lie down in Shavasana (Corpse Pose).
  5. Ensure that your neck is relaxed — lift your shoulders slightly to reduce pressure.

Benefits of Headstand

  • Brings radiance and glow to the face.
  • Helps maintain natural black hair.
  • Strengthens the digestive system.
  • Activates the endocrine glands, keeping hormones balanced.
  • Enhances mental focus, balance, and confidence.

Precautions

  • Never rush while performing the pose.
  • Avoid putting excess pressure on the neck.
  • Do not practice if you have back pain, neck pain, or shoulder issues.
  • The mat or blanket should be firm — not too hard or too soft.
  • People with high blood pressure should avoid this pose.
  • Keep your body centered within the triangle.

Dear friends,
With heartfelt respect, we bow to you all.
Stay happy, light, and blissful!

– Yogacharya Dhakaram
Founder, YogaPeace Sansthan

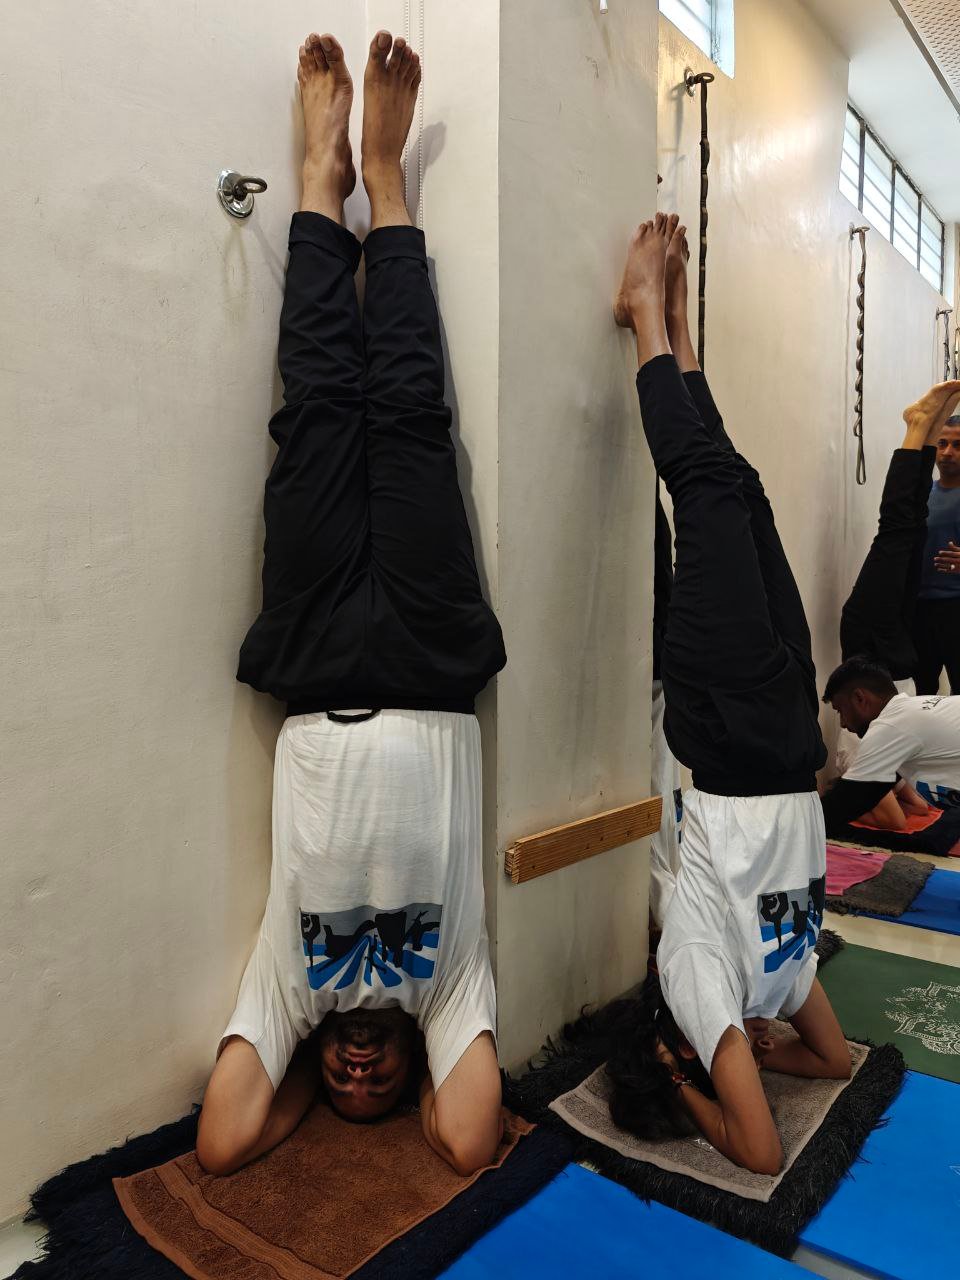
Part 2 — Headstand (Sirsasana with Wall Support)

Dear Friends,
Warm greetings to all of you with a smiling heart!
Welcome once again to our program “One Step from Health to Happiness.”
We hope you are doing great — because you all practice yoga regularly.


How to Practice Headstand with Wall Support

In our previous session, we discussed the basics of Sirsasana (Headstand).
Today, let’s learn how to improve the posture and maintain better balance using wall support, especially for those who find it difficult to balance independently.

Preparation

  • Use a blanket or yoga mat for comfort.
  • Ideal size: 2 feet long, 2 feet wide, and 2–3 inches thick.
  • Place it near the wall.

Step-by-Step Method

  1. Interlock your fingers firmly.
  2. Open your elbows and place them on the mat — keeping them shoulder-width apart.
  3. Face the wall and form a triangle with your elbows and fingers.
  4. Place the topmost part of your head on the mat.
  5. Support the back of your head with your palms.
  6. Lift your hips upward and bring your waist close to the wall.
  7. Once you can hold this position comfortably for 2–3 minutes without neck strain, slowly raise your legs up and rest them against the wall.

Key Points

  • Keep your hips contracted.
  • Try to balance your body steadily.
  • In the beginning, practice for 1–2 minutes only; gradually increase to 5 minutes.
  • Keep your breathing normal throughout.

Returning from the Posture

Slowly bend your knees and come down to Child’s Pose (Shashankasana).
Rest your head over your hands for a few moments.
Then lie down in Shavasana (Relaxation Pose) for complete rest.

⚠️ Note: Avoid putting too much pressure on the neck.
Keep your shoulders slightly raised to distribute the weight evenly.


Benefits of Sirsasana

  • Positively affects the entire body
  • Adds natural glow to the face
  • Helps keep hair dark and healthy
  • Strengthens the digestive system
  • Activates endocrine glands
  • Balances hormonal functions

Precautions

  • Never rush while performing the pose.
  • Avoid if you have neck pain, back pain, or shoulder injury.
  • Ensure the mat or blanket is neither too soft nor too hard.
  • People with high blood pressure should avoid Sirsasana.

Dear friends,
We bow to you all with heartfelt respect.
May you stay happy, joyful, and blissful always!

Yogacharya Dhakaram
Founder, YogaPeace Sansthan

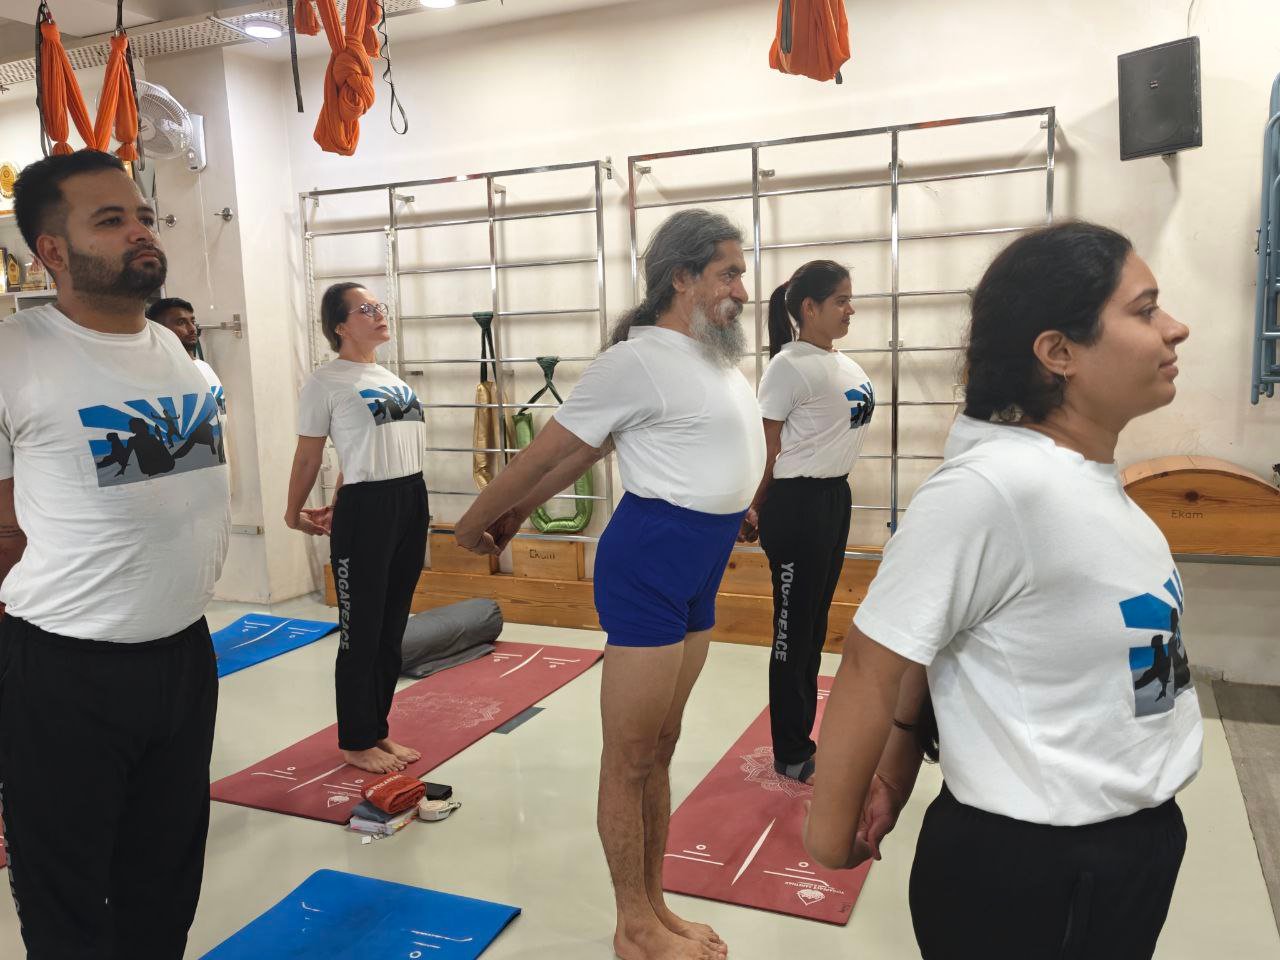
Simple Yoga Practice for Shoulder and Neck Alignment

Namaste, Dear Friends

A smiling welcome to all of you in our program “Ek Kadam Swasthya Se Anand Ki Ore”A Step from Health to Happiness.
We hope you all are doing well — and of course, you are, because you practice yoga every day!


Recap of Previous Sessions

In our previous sessions, we discussed:

  • The right way to perform Headstand (Shirshasana)
  • The correct way to stand properly
  • The right posture for sitting

Today, let’s explore how to keep your shoulders and neck in perfect alignment.


Understanding Cervical & Neck Issues

In conditions like Cervical Spondylitis, the neck alignment often gets disturbed.

  • The upper back and neck tend to bend forward.
  • The shoulders become uneven.
  • Gradually, a slight hump appears on the upper back.

But don’t worry — with simple daily practice, this can be corrected naturally.


Yoga Practice for Shoulder and Neck Alignment

Step-by-Step Method

  1. Stand straight in Samsthiti (neutral position).
  2. Interlock your fingers behind your back.
  3. Stretch your arms backward and slightly upward.
  4. Keep your chest lifted and expanded.
  5. Close your eyes and keep your spine straight.
  6. Maintain this stretched position for at least one minute.
  7. Slowly release the posture —
    • Bring your hands back near your waist,
    • Hold one wrist with the opposite hand,
    • Relax your arms completely.
  8. With eyes closed, observe the changes in your body.

Who Should Practice This

This exercise is especially beneficial for:

  • Office workers who sit in front of computers all day,
  • Those who spend long hours looking down at mobile phones,
  • People who sit with a bent back for long periods.

👉 Practice this simple yoga stretch 3 to 4 times a day.
I can say with full confidence —
If you do it regularly, you will never experience shoulder or neck pain again.


A Gentle Reminder

Stay happy, relaxed, and blissful always. 🌸

– Yogacharya Dhakaram
Founder, YogaPeace Sansthan

Shirshasana (Part 1) – The King of Asanas

Dear friends, warm greetings to all of you!
Welcome once again to our article series “A Step from Health to Happiness.”

Today, we will talk about Shirshasana, also known as the King of Asanas.
The word “Shirshasana” comes from two Sanskrit words — ‘Shirsha’ meaning head and ‘Asana’ meaning posture.
It is considered one of the most powerful yoga poses because it activates the endocrine system and brings overall balance to the body.


Precautions and Preparation Before Doing Shirshasana

Even if you already know how to do Shirshasana, never perform it suddenly or to impress someone.
It is a spiritual and mindful practice, not a display of skill.

Remember, the skin on our head is much more sensitive than that of our feet. Therefore, stability, control, and safety are very important.


Steps to Practice Shirshasana

  1. Preparation:
    Use a folded blanket or a mat of about 2 feet in length and width, and 2–3 inches in height.
  2. Hand Position:
    Interlock your fingers and keep your elbows shoulder-width apart, forming a triangle with your forearms and hands.
  3. Head Position:
    Place the top of your head on the ground, and rest the cupped palms around the back of your head.
  4. Body Alignment:
    Keep your back straight. Bend your knees and slowly lift your legs off the floor.
    Straighten your legs upward, engaging your core muscles.
    Keep your hips tight and maintain your balance with normal breathing.
  5. Duration:
    In the beginning, stay for 1–2 minutes, and gradually increase to 5 minutes with regular practice.

Coming Out of the Pose

While coming down, bend your knees slowly and rest in Shashankasana (Child Pose).
Place your head on your hands and relax there for a while.
After that, lie down in Shavasana (Corpse Pose) for complete relaxation.

Ensure that there is no strain on your neck.
To avoid this, slightly lift your shoulders upward while balancing.


Benefits of Shirshasana

  • Brings natural glow and brightness to the face.
  • Helps prevent hair fall and promotes dark, healthy hair.
  • Strengthens the digestive system.
  • Activates the endocrine glands, keeping hormones balanced.
  • Brings overall health and vitality to the entire body.

Precautions

  • Never rush or jerk your legs upward.
  • Avoid any strain or pressure on the neck.
  • Always practice on an empty stomach and preferably under the guidance of a yoga teacher.

So dear friends, with heartfelt respect and love, we bow to you all.
In the next part, we will explore deeper insights and variations of Shirshasana.

Yogacharya Dhakaram
Founder – YogaPeace Sansthan

Special Birthday Song

Lyrics:

(आजका दिन आपका दिन)
(आजका दिन आपका दिन)
(आजका दिन आपका दिन)

जनम दिनकी शुभकामना
मुस्कुराते शुभकामना

(It’s your day and big day.)

Smile birthday to you.
जनम दिनकी शुभकामना

(ऐसे ही मुस्कुराना, खिलते खिलाते रहेना)

(भगवानकी अनुकम्पा, ऐसे बरसते रहेनना)
May god always bless you, and stay happy and healthy.

(Happy happy happy happy happy)

(Happy birthday to you)

(शभकामना, शुभकामना, शुभकामना आपको)

(Wish you………wish you)

(Smile birthday to you)
to you..

Pranayama – The Foundation of Exercise

Dear Friends, Warm Greetings to You All!

Welcome once again to our series “Ek Kadam Swasthya Se Anand Ki Ore” – A Step from Health to Happiness.

How are you, dear friends?
You must all say with a smile — “We are joyful and spreading happiness in this world!”
Let’s always stay cheerful, peaceful, and full of positive energy.


The Importance of Pranayama

Today, we will talk about Pranayama — the true foundation of all physical exercise.
No form of exercise is complete without pranayama.

You might wonder, “Why is that so?”
Read this article carefully and then reflect — you’ll realize how essential pranayama truly is.

In today’s time, most of us live with a lack of mental peace.
We do cycling, running, and other physical workouts —
but they often carry a spirit of competition, not calmness.
As a result, we strengthen our body but fail to relax our mind.


The Deep Connection Between Breath and Mind

You may have heard this truth —

“The deeper and longer your breath, the calmer your mind becomes.”

Or we can say —

“The calmer your mind, the deeper and steadier your breath.”

Our breath and mind are closely connected — each influences the other.
Therefore, it is essential to include Pranayama along with your daily exercise.

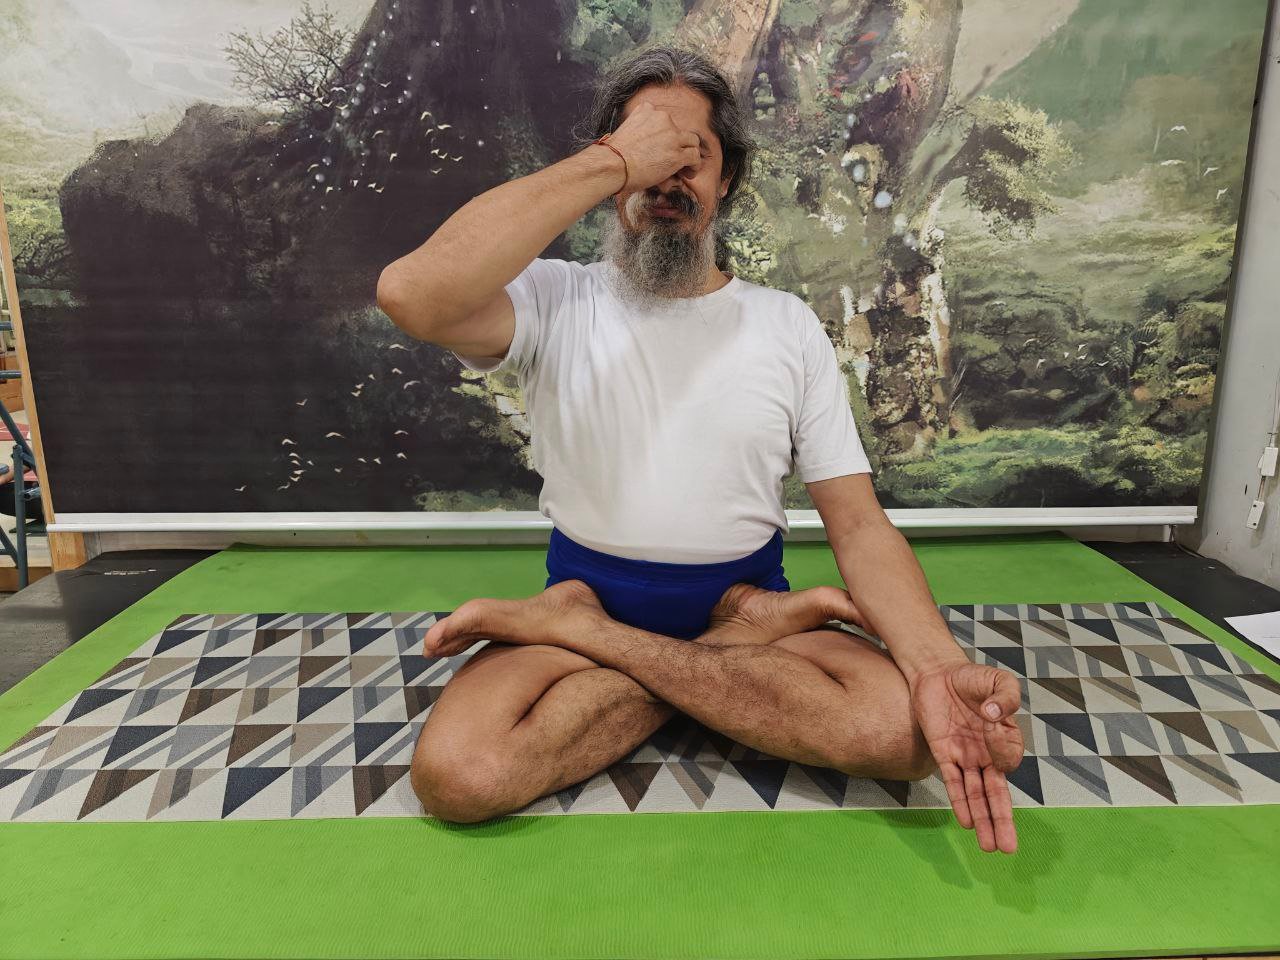
For peace of mind and emotional stability, practice pranayama regularly.
These three pranayamas are especially beneficial:

  • Kapalbhati Pranayama
  • Bhastrika Pranayama
  • Anulom Vilom Pranayama

Balancing Mental and Physical Strength

Just as a strong body is important, a strong and steady mind is equally vital.
If we are mentally weak, physical strength alone is of little use.
It is our mind that truly governs our body.

Modern life often brings stress and anxiety, which slowly impact our physical health as well.
Prolonged mental tension weakens the body over time.
Hence, maintaining mental balance is the key to overall health.

Just 15 Minutes for Yourself

All you need to do is devote 15 minutes daily to pranayama.
Practice consistently for 10 days, and notice the changes —
You will feel the difference in your body, mind, and emotions.
Within just a few days, your mind will become calmer, clearer, and more peaceful.


In Conclusion

Dear friends,
My humble salutations to all of you.
Stay happy, cheerful, and blissful always.

Thank you all for reading and being a part of this wellness journey.

Yogacharya Dhakararam
Founder – Yogapeace Sansthan

A Step Towards Health and Joy: Parvatasana

Hari Om 🙏 A smiling Namaskar to all of you.
We warmly welcome you to our program “A Step Towards Health and Joy.”

Currently, our blog series is focused on Surya Namaskar (Sun Salutation). In the previous post, we discussed Ashwa Sanchalan Asana (Equestrian Pose). Today, we will talk about Parvatasana (Mountain Pose).

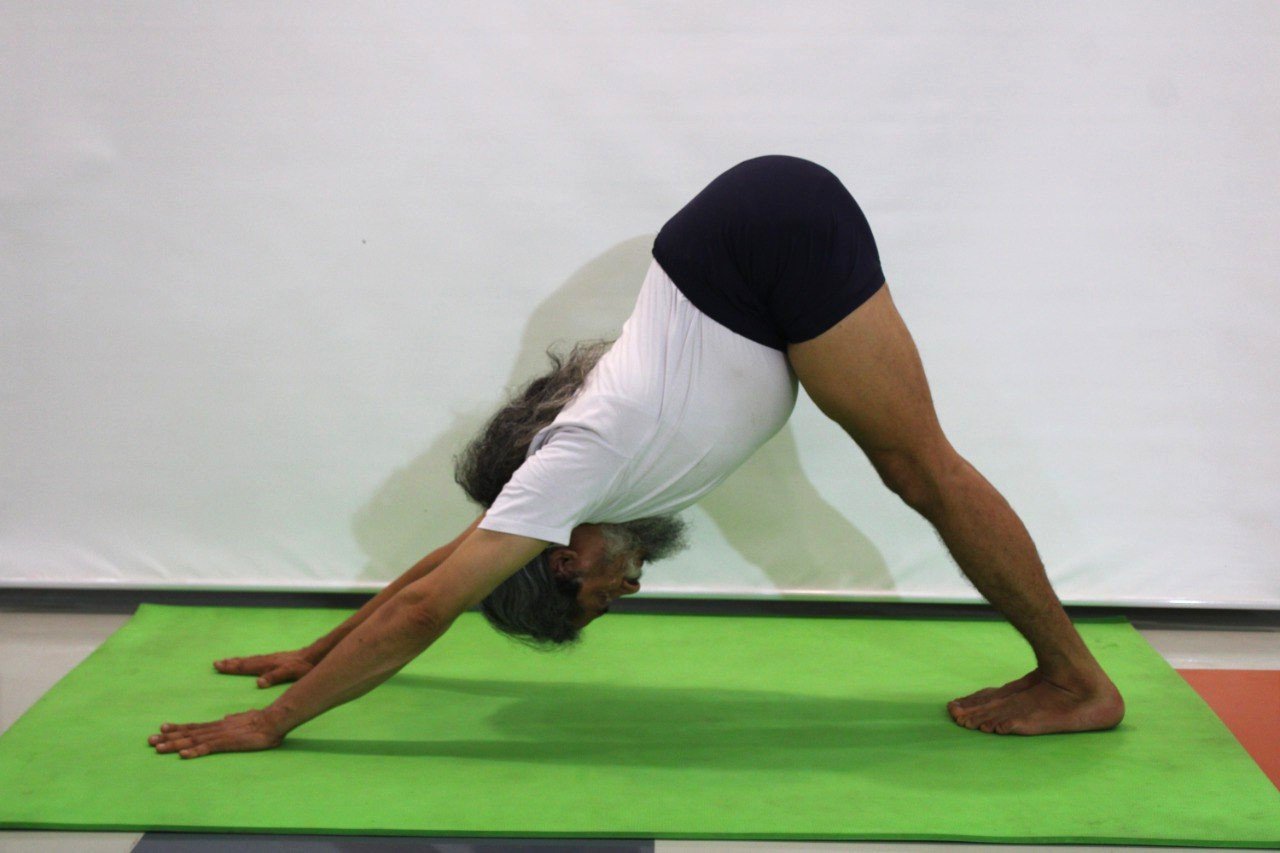
Since the body takes the shape of a mountain in this posture, it is called Parvatasana. This asana is highly beneficial for the entire body. It stretches the muscles, builds strength, and calms the mind.

How to Move from Ashwa Sanchalan Asana to Parvatasana

  • In Ashwa Sanchalan Asana, the right leg is placed back.
  • To come into Parvatasana, lift your hips upward and slowly take the left leg back as well.
  • Align the heel of the left foot with the heel of the right foot.
  • Pull the hips and lower back upward.
  • Keep the head between the arms.
  • Both legs should remain straight and the heels touching the ground.
  • The hips should remain lifted upward towards the sky.

Points to Remember While Practicing Parvatasana

  • Keep the knees straight.
  • Try to press the heels onto the ground.
  • Maintain body balance and try to stay in this posture for at least 20 seconds.

Benefits of Parvatasana

  • Strengthens the shoulders.
  • Very beneficial for the legs.
  • Improves blood circulation to the head, bringing glow to the face.
  • Keeps the brain active and healthy.
  • Makes the spine flexible.

Special Note

While performing Parvatasana, the face remains downward, which increases the blood flow towards the head and face. This enhances skin health, freshness, and radiance.

A Glimpse of the Next Blog

Dear friends, in the next blog of the Surya Namaskar series, we will talk about Bhujangasana (Cobra Pose). Stay connected with us and keep reaping the benefits of yoga for your health.

So, dear friends, salutations to all of you.
Stay happy, cheerful, and blissful always. 🌸

Yogacharya Dhakaram
Founder – YogaPeace Institute